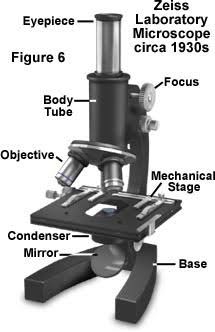
If you’ve ever sat in front of the microscope parts to determine which knob does what, you’re not the only one. Between the eyepiece, nosepiece, and condenser, as well as a few other components, the names alone can be confusing, particularly when trying to repair something or purchase an item that isn’t listed, and each listing has various names.
This article breaks a microscope parts into three components that really are important in the microscope parts: the optical system that increases the magnification of the object, the illumination system which illuminates the object, as well as the mechanism that keeps the entire thing in place. When you are aware of the systems that each component is microscope parts of, the entire instrument ceases to be an unsolved puzzle and begins becoming clear.
The Optical System: Where Magnification Happens
The optical system is the group of lenses responsible for turning a tiny, invisible detail into something you can actually see. It’s also the microscope parts people damage — and replace — most often.
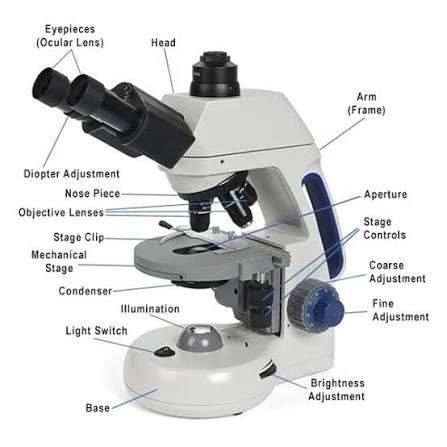
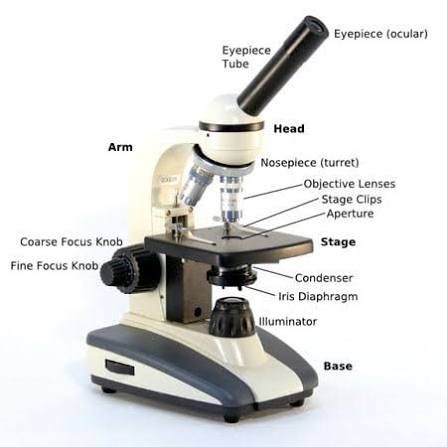
Eyepiece (Ocular Lens)
This is the lens that you see through, which is usually identified as 10x or even 15x. Its job is to take the image already magnified by the objective lens and magnify it a second time. Multiply the power of your eyepiece by the objective lens used, then you will get the total magnification; for example, a 10x lens that has a 40x objective can give you 400x. Eyepieces are available in various tube dimensions (23.2mm is the norm on a majority of compound microscopes parts, although stereo microscope parts usually employ 30mm), and the replacement must fit the tube size of the microscope parts and not just the magnification.
Objective Lenses
Mounted on the rotating nosepiece, these are the primary magnifying lenses and the ones doing the real optical work. A typical set includes 4x (scanning), 10x (low power), 40x (high power), and 100x (oil immersion). Objectives aren’t all built the same way, either:
- Achromatic — the standard, budget-friendly option most student microscopes parts ship with
- Plan achromatic — corrects the image so it’s sharp edge-to-edge, useful for photography
- Semi-apochromatic / Plan Fluorite — better color correction, mid-range price
- Apochromatic — the sharpest color correction available, generally reserved for research-grade instruments
Nosepiece (Revolving Turret)
The rotating disc that holds your objectives and clicks each one into place as you switch magnifications.
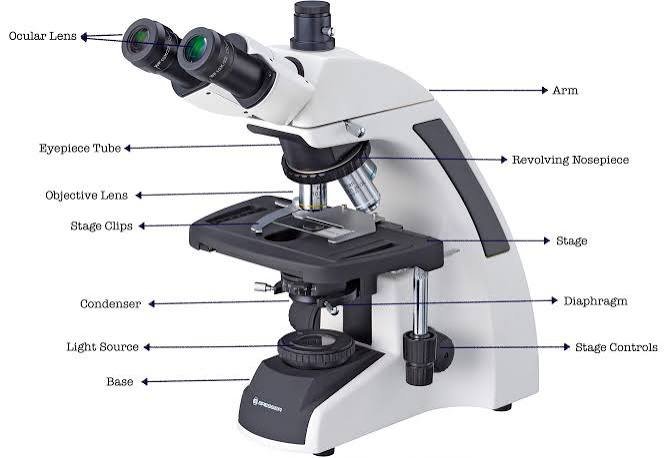
Condenser Lens mounted beneath the stage, the condenser focuses light into a tight cone aimed directly at the specimen. This part gets blamed far less often than it should — a dirty or misaligned condenser is one of the most common reasons for a blurry image, and people frequently replace an objective lens when the real problem was sitting a few inches lower the whole time.
Iris Diaphragm a ring of overlapping metal blades that opens and closes to control not just brightness, but contrast. This is different from simply turning up the light — contrast control genuinely changes how visible fine detail becomes.
The Illumination System: Getting Light to the Specimen
Light Source
The majority of modern microscopes parts utilize LED illuminations, which operate cool and last from 20,000 to fifty thousand hours. Some older models and even some lab-grade models utilize halogen lamps instead, which produce warmer light, higher heat, and a shorter life expectancy of 500-2,000 hours. If there’s one consumable microscope parts you should expect to replace eventually, it’s the bulb.
Rheostat
The dial regulates brightness independently from the diaphragm.
Mirror
Found on older or non-electric microscopes parts a reflector is a reflective surface that reflects light from outside or ambient light upwards through the condenser rather than relying on a built-in lamp.
Field Diaphragm
Present mostly on higher-end microscopes parts, this controls the width of the light beam entering the condenser to cut down on internal glare — distinct from the iris diaphragm, which controls light intensity rather than beam width. Together, a properly adjusted field diaphragm and condenser create what’s known as Köhler illumination, the standard for even, glare-free lighting in research settings.
The Mechanical System: Structure, Stability, and Focus
Base and Arm
The base is the stable bottom platform (and on electric microscopes, it usually houses the illuminator). The arm connects the base to the head and is the correct — and only — safe carrying point.
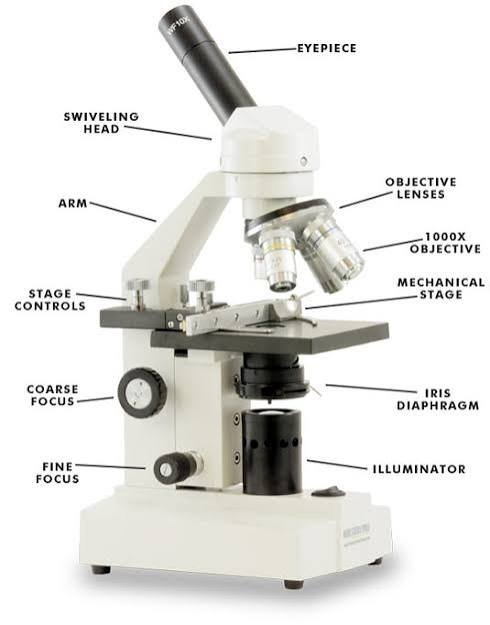
Stage the flat platform that holds your specimen slide. A plain stage requires you to slide the specimen by hand; a mechanical stage has X-Y control knobs that let you move the slide with precision, which matters a lot once you’re trying to track a specific cell or organism across a slide.
Stage Clips simple spring clips on a plain stage, or a sliding clamp on a mechanical stage — either way, their job is to keep the slide from shifting.
Coarse and Fine Focus Knobs.
The coarse knob gets you into rough focus quickly; the fine knob makes the small, precise adjustments needed for a genuinely sharp image at higher magnification. Gear wear here is common on well-used classroom microscopes parts showing up as focus that “slips” or won’t hold.
Head and Body Tube
The head contains the eyepiece assembly, while the body is responsible for maintaining an exact measurement between the eyepiece and the objective necessary for a proper image to form. Heads are available as single-eye (one eyepiece) and binocular (two eyepieces that are more comfortable for eyes during long periods) as well as trinocular (two eyepieces and camera port) options.
At a Glance: Microscope Parts
Common Replacement microscope Parts System Functions: Trigger Eyepiece, Second Stage Magnification for Scratches and Fungus is often an overlooked component. When your scopes have dropped out of focus with fogging, fogging is often an issue and should be checked as soon as possible to protect from the risk of any scratches that might appear over time. Objective Lens Magnification Primary Magnification Drops Scratches Chips Condenser Focusing light onto specimen Cracks Misalignments etc
Iris diaphragm:
optical controls contrast/light for bent or jammed blades; also lights LED/halogen bulbs for illumination/light source burnout (expected) by mechanical stage mechanical precise slide positioning stripping gears warping Fokus knobs sharpen image gear slippage How Light Actually Travels Through a Microscope parts.
It is helpful to think of the entire process as one unending path instead of an unrelated list of components:
- The source of light (LED or halogen bulb or mirror) creates and redirects the flow of light.
- The condenser concentrates that beam of light onto a cone directed at the subject.
- The iris diaphragm controls the way light is reflected and alters the contrast.
- The light is reflected off of the object upon the set.
- This lens captures the light and produces the first magnified imag
- The image travels up the body tube to the eyepiece.
- The eyepiece magnifies the image a second time — or sends it to a camera on a trinocular setup.
Understanding this sequence is genuinely useful for troubleshooting. If your image looks dim, blurry, or low-contrast, working backward through this list — starting with the condenser and diaphragm before touching the objective — will usually get you to the real problem faster.
Compound vs. Stereo Microscope Parts
Not every microscope parts has the same part list, and mixing up the two most common types causes a lot of buying mistakes.
Compound microscope parts are designed to view thin, transparent specimens that emit transmitted light. They come with a condenser and an iris diaphragm, as well as powerful objectives that are up to 100x oil immersion. This is the kind of microscope parts people imagine in biology classes. Stereo (dissecting) microscope parts are built for opaque, three-dimensional objects — insects, circuit boards, rocks, jewelry. They typically skip the condenser entirely, use much lower magnification (often 1x to 4x), and have two separate optical paths so you see a true 3D image rather than a flat one.
If you’re buying replacement microscope parts, always confirm which type you own first — an eyepiece or objective from one type generally won’t fit or function correctly on the other.
Buying Replacement Parts: What Actually Matters
Before making a purchase it is important to make some choices that can save you from a costly return.Be sure to know the exact spelling of your model and also the brand you bought it from. The sizes of the threads as well as the diameters of eyepiece tubes and the mounting standards differ among manufacturers and can’t be interchanged in default.Check the thread standard. Most modern objectives use the DIN standard; some older Japanese-made optics use the JIS standard instead. The two aren’t compatible.
Make sure you consider OEM and off-market parts prior to selecting the best one. In deciding what part you will choose, think about: (1) OEM (Brand-Specific)
Aftermarket/Universal: Guaranteed parfocal match between lenses Price (OEM vs Aftermarket/Universal) Lower typically 30-70% when choosing from aftermarket versions Best for clinical, research, warranty-covered units, student and hobby microscope parts. Buy matched sets when possible. A mismatched set of objectives from different brands can throw off parfocal length, meaning you have to refocus every time you switch magnification — buying a matched 4x/10x/40x/100x set avoids that entirely.
Here’s a general sense of what microscope parts actually cost, since pricing is something almost no other guide on this topic includes:
Part Student/Aftermarket Research-Grade/OEM
- Eyepiece (WF10x) is priced at 10 to $50. $150-$300. Eyepiece lens (4x-40x) $15 to $65 and $300-$1000.
- Objective lens 100x oil): $50-$130; $500-$1,500+ LED Illuminator: $8-30; $50-150 Mechanical stage: $30-$90; $200-$700.
- Prices vary based on various variables, including the seller’s condition and location; consider these as general estimates instead of specific quotations.
- Where Can You Locate microscope Parts and Repairs
- General marketplaces tend to offer quick delivery of student-grade parts such as eyepieces, objectives, bulbs, and stage clips; for brand-specific OEM parts from Nikon, Olympus, Zeiss, or Leica equipment, however, specialist optics vendors and authorized service centers tend to offer better options than generic listings.
- If your lab or clinical equipment requires quick repair, finding a certified microscope parts technician or authorized service center nearby may be faster than sending it off for mail-order repairs; university towns often feature specialization in scientific supply shops worth exploring.
- Avoid Common Errors Now: Buying an objective by magnification number alone without checking the thread standard.
- Touching lens glass with bare fingers — skin oils etch coatings over time
- Overtightening nosepiece or focus screws, which strips the threads
- Using canned/compressed air directly on lenses instead of a proper blower bulb
- Assuming a new objective will fix blur without checking the condenser first
- Doing the job of opening and cleaning an objective lens that is sealed by yourself is a violation of warranties and can cause permanent misalignment. This type of internal cleansing needs to be handled by a seasoned technician.
Frequently Ask Questions
What are the top three important components of the lens?
The eyepiece, objective lenses, nosepiece, condenser, stage diaphragm, light source, base arm, and fine/coarse focal knobs comprise the major components that are found on the majority of compound microscope parts.
What is the purpose of the objective lens?
The objective lens is the primary magnifying lens on the nosepiece. It draws illumination from the sample and creates its first magnified image, which is then magnified further by the eyepiece.
What component controls the intensity of the light reflected?
The iris diaphragm regulates light volume and contrast. The rheostat regulates the general brightness of the bulb, and, on models with higher quality, the field diaphragm regulates the size of the beam of ligh..
Are you able to use any eyepiece in all microscopes parts?
No. The diameter of the eyepiece tube and parfocal length must correspond to the specific microscope parts you are using — a stereo-scope with a 30mm eyepiece, for instance, isn’t able to fit in the 23.2mm lens tube.
Does the bulb within the instrument be changed?
They’re categorized as consumable items and are therefore considered to be normal. but LED bulbs can last for long periods of period of time without replacement.
What’s the difference between coarse and fine adjustment knobs?
The coarse knob performs massive, swift movements that draw the focus of the object. Fine knobs can be employed to make small, precise adjustments that produce a crisp image, particularly when the magnification is larger.
What is the reason my microscope requires oil for the 100x immersion?
At 100x zoom and beyond, the distance between the lens and the slide is tiny enough that air can alter light, which can cause blurring of the image. The refractive index of the immersion oil is akin to the refractive index of glass which allows light to travel through a straight path, helping to preserve clarity.
What’s the cause of why my image isn’t blurry after I replaced the lens used to create the objective?
Blur is more frequently due to an unclean or misaligned condenser, a blurred eyepiece, or an incorrect working distance, as opposed to the objective itself. It’s important to clean and center the condenser prior to assuming that the lens is the cause.
Conclusion
A microscope parts is not complex until you take it apart. What it really is is an optical instrument that can magnify the specimen, an illuminator system that illuminates the object, and a mechanical system that keeps everything in the right place. The majority of “my microscope parts is broken” instances that people encounter can be traced back to a dirty condenser, an old focus gear, or a blown-out bulb, not the costly objective lens, which is usually the culprit first.
If you’re buying replacement microscope parts, start by confirming your exact brand and model, check whether you need a DIN or JIS thread, and buy matched sets when you can to keep your objectives parfocal. Get those basics right, and most microscope parts decisions become a lot less stressful than they first seem.
These information about Projector Mount are gathered from different surveys, medical tests and tech giants like Techradar and more. Our top priority is to provide you valuable information.
For More Details About Different Projectors Click Here