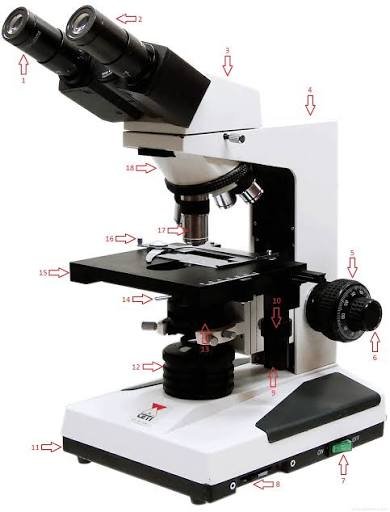
Parts of the microscope is made up of the optical, mechanical, and illumination systems. A lensed optical system (eyepiece and objective lens) can enhance the subject. Mechanical components (stage arms, stage the focus control knobs) makes sure that the entire system remains stable as well as an illumination mechanism (light the source and diaphragm as well as condenser) determines the amount of light can be able to penetrate the object.
If you’ve ever looked at a diagram, trying to determine if “nosepiece” or “nosepiece” is the same thing as the “turret,” or wondered why your image becomes blurred when you turn up the power, you’re not the only one. The majority of confusion about parts of the microscope boils down to a lack of understanding of the function of each component -and what it does.
This guide will walk you through each essential component parts of the microscope. It describes what each does, and how they interact to transform a glass slide into a precise magnified image.
Why Knowing the Parts Actually Matters
It’s tempting to think of this as a rote learning task — mark the diagram, take the test, and proceed to the next step. But knowing the reason for each piece will affect how you utilize the tool.
If you’re aware of how the fine focus knob shifts the slide in huge jumps, you’ll know why a 40x zoom will cause slide cracks. If you’re aware that the diaphragm controls the intensity of light, the image that is washed out ceases to be a mystery and is a fix in two seconds.
Students, this information helps to avoid exam confusion. For teachers, it makes troubleshooting classroom equipment faster. For lab technicians and researchers, it’s the difference between guessing and diagnosing.
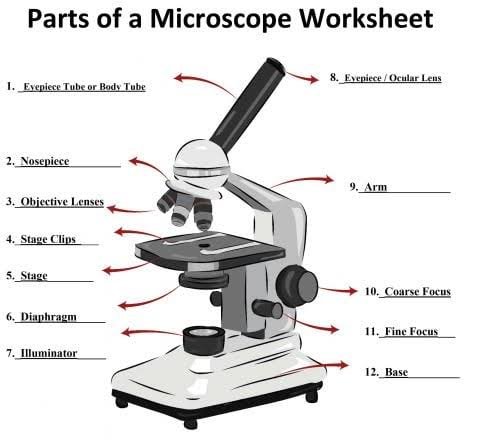
The Optical System: Where Magnification Happens
It’s what people think of when they think parts of the microscope. It’s comprised of lenses that work to increase the size of the object.
Eyepiece (Ocular Lens)
The eyepiece is what you view through, which is usually situated on the uppermost parts of the microscope. It typically provides 10x magnification on standard models. Certain parts of the microscopes come with one eyepiece (monocular) or two (binocular) or two with camera ports (trinocular) to record digital images.
Objective Lenses
These are the lenses closest to the specimen, and they provide the bulk of the magnification. A typical set includes:
- 4x (scanning) — used to locate the specimen on the slide
- 10x (low power) — general viewing and orientation
- 40x (high power) — reveals cellular detail
- 100x (oil immersion) — used with oil immersion to create the clearest image.
- To determine the magnification of your lens then you must multiply the capacity of your lens with the amount of power it comes with. An item that has 10x magnification and has a focal length of 40x provides users with 400x magnification in total.This is a simple formula; however, it’s not for everyone. Many students take tests.
Nosepiece (Revolving Turret)
This is the rotating disc that holds all the objective lenses. Turn it, and it clicks each lens into place over the specimen. It’s also called a “revolving turret,” which is exactly why so many people search for whether the two terms mean the same thing. They do.
A well-made nosepiece is parfocal, meaning the image stays roughly in focus as you switch between lenses you shouldn’t need to completely refocus every time you change magnification.
The Mechanical System: What Holds Everything Together
While the optical system does the magnifying, the mechanical system is what makes parts of the microscope usable, stable, and safe to operate.
Base and Arm
The base is the bottom support structure. On most modern parts of the microscope, it also houses the built-in light source. The arm connects the base to the head and is what you should always hold when carrying parts of the microscop one hand on the arm, one hand under the base.
Stage and Stage Clips
The stage is the flat platform where the slide sits. Most stages include stage clips, or a full mechanical stage with adjustment knobs that let you shift the slide left, right, forward, or back in small, controlled movements. This matters more than it sounds trying to nudge a slide by hand at 400x magnification is nearly impossible.
Coarse and Fine Focus Knobs
- These two knobs are where most beginner mistakes happen.
- The coarse knob for focusing shifts the stage over a considerable distance to allow rapid, rough focus. It is best employed with low-power targets (4x or 10x).
- The fine focus knob makes tiny, precise adjustments and is what you switch to once you’re on high power.
- Using coarse focus at 40x or 100x is one of the fastest ways to crack a slide or scratch a lens the working distance at high magnification is razor-thin, and a big, sudden movement doesn’t leave room for error.
Body Tube (Head) and Rack Stop
The body tube, sometimes called the head, connects the eyepiece to the objective lenses and keeps them properly aligned. Parts of the microscope rack stop is a small but important safety feature it limits how close the stage can get to the objective lens, preventing accidental collisions between the glass slide and the lens.
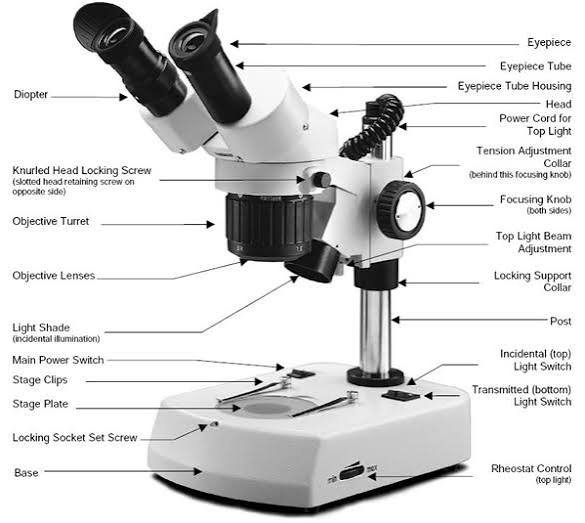
The Illumination System: Getting Light Where It Needs to Go
Magnification means nothing without light. This system controls how much light reaches the specimen and how sharply it’s focused.
Light Source (Illuminator or Mirror)
Modern microscopes generally have an integrated LED bulb or a halogen lamp, which is located inside the base. The older models, or portable ones, use a mirror to reflect light from the outside to the object instead.
Condenser
Positioned just below the stage, the condenser focuses light into a concentrated beam aimed at the specimen. For the basic parts of the microscope used in classrooms, they could have an ordinary fixed lens. On more sophisticated models, they have an adaptable Abbe condenser, which can be adjusted to a higher or lower setting for a sharper contrast. It’s particularly useful for methods such as Kohler illumination.
Diaphragm (Iris Diaphragm)
The diaphragm lies beneath the camera and is responsible for the amount of light that is able to pass through it and functions similarly to the aperture in cameras. Some entry-level parts of the microscope make use of a simple diaphragm that rotates instead of a real aperture. In any case, it is the first thing to look into when your image appears too dark, too bright, or lacks contrast.
How the Parts Work Together: The Light Path
It can help trace the path that light travels through parts of the microscope. Start from the beginning to the end:
The light source generates light.
- The condenser focuses that light into a tight beam.
- The diaphragm controls how much of that light is able to pass through.
- Light travels through the model at the back of the stage.
- This optical lens can magnify and capture what it observes.
- This image travels into the tubes of the body.
- The eyepiece magnifies it once more before it reaches your eye.
Every adjustment you make focus, light, lens selection happens somewhere along this path. When you are able to visualize the problem, it becomes a matter of elimination instead of speculation.
Compound Vs. Stereo vs. Digital Microscopes
Each microscope is constructed in the same manner. The differences in parts of the microscope come in the form of which components are included and how they’re utilized.
Highlights:
Compound Microscope, Stereo Parts Of The Microscope, Digital Parts Of The Microscope in combination; magnification range from 40x to 1000xplus (screen-dependent).Eyepiece Required: Yes (dual for depth and optional or absent). Flat image and 3D Surface Detail Displayed On Screen.
Light passes through the specimen and then reflects off it, which is then either transmitted back through or digitally captured. Ideal for cell cultures, bacteria samples, tissue samples, insects, coins, circuit boards, classrooms with shared viewing/recording capability
Parts of the microscope is what most people picture in a biology classroom — it needs thin, light-permeable specimens because the light has to pass straight through them. A stereo parts of the microscope works the opposite way, bouncing light off solid objects to create a three-dimensional view, which is why it’s the better choice for examining something like an insect or a circuit board. The digital parts of the microscope replaces the traditional eyepiece, and comes with an image sensor, as also a display that allows you to talk about what you’re looking at with other people, which is becoming more popular within remote classrooms as well as setups.
- Do you want to study blood cells, bacteria, and thin tissues? Go compound — you’ll need transmitted light and high magnification.
- Examining coins, insects, or solid objects? Go stereo — you’ll want depth and reflected light.
- Teaching a group or recording sessions? Go digital — it projects to a screen instead of a single eyepiece.
- Doing serious lab or pathology work? A lens for oil immersion with 100x magnification offers the best resolution.
Common Mistakes to Avoid (CCMA).
- Using the coarse knob with the highest magnification (risk of damaged slides or scratched lenses)
- Skipping immersion oil at 100x, which leaves the image too dim to use properly
- Touching lenses with bare fingers instead of lens paper
- Carrying the microscope by the stage or eyepiece instead of the arm
- Leaving the microscope uncovered, letting dust settle on the optics
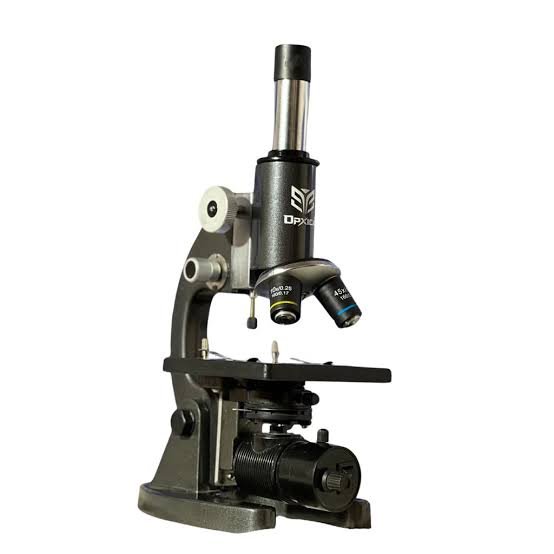
Keeping a Microscope in Good Condition
A little routine care extends the life of every parts of the microscope described above:
- Clean lenses only with lens paper and approved cleaning solution — never a cloth or tissue
- Store with the low-power objective in position and the stage lowered
- Use a dust cover after every session
- Check stage clips periodically to make sure they still hold slides securely
- Replace a dim bulb or LED promptly rather than compensating with the diaphragm
FAQ
What are the main components of the camera?
The main parts comprise the eyepiece, objective lenses diaphragms, the nosepiece light source for the stage Fine as well as coarse knobs to focus and body tubes arm, the base.
What are the components an instrument has?
This varies depending on how a source groups components some count 10, others count up to 14 by separating items like stage clips or the rack stop into their own categories. There’s no one official number, but what’s important is understanding the role each component plays.
What’s the role of the objective lens?
It provides the primary magnification of the specimen. It is often used with an eyepiece that measures the magnification.
What’s the reason for diaphragms in microscopes?
It regulates how much light can be able to pass through the lens.It also regulates intensity and brightness just like that of the lens’s aperture.
What’s the distinction between fine and coarse focal point?
Fine focus is able to make huge adjustments to improve the speed of focusing when power is low, whereas fine focus allows for small, precise adjustments which are needed for more precise detail when magnifying higher.
What portion parts of the microscope house slides?
The stage holds the slide. It is typically secured using stage clips or a stage clamp that permits controlled movement.
What is the reason I require an immersion oil for 10x?
At 100x, the working distance is such that the air between the slide and lens alters the path of light. The refractive index of water is the similar to that of glass. This keeps the illumination on a straight path which results in a more clear view.
The term used to describe the eyepiece?
It’s also known as the ocular lens.
Conclusion
Each parts of the microscope performs an important job when you know how they work -from the light source to the condenser and diaphragm, back to the object, the specimen to the objective, the objective via the tube of your body, and finally to the eyepiece the entire instrument ceases to feel like an empty box.
When you’re labeling diagrams in class, deciding between a compound and stereo parts of the microscope, or trying to determine the reason your image appears dim, the answer typically is rooted in one of the areas covered in this article. Begin at the beginning of your light pathway, then know the functions of each control, and the rest will become natural.
These information about Projector Mount are gathered from different surveys, medical tests and tech giants like Techradar and more. Our top priority is to provide you valuable information.
For More Details About Different Microscope Click Here